
Gluten-Free
When I told my mother-in-law that I was making a Chocolate Cream Pie, she started laughing and said, “That makes me think of the movie ‘The Help’ and the Chocolate Pie!” I grimaced as I thought about that particular scene, then started laughing as well, picturing Two-Slice Hilly eating her chocolate pie with it stuck all up in her teeth. I replied, “When I think of Chocolate Cream Pie, it makes me think of Goldie Hawn in the movie ‘Overboard’ as she hands the boys a Chocolate Cream Pie that she made, then attacks them with a water hose!” Either way, it’s funny how we associate things with movies, especially when it comes to food.
I don’t know how Goldie made the crust of her Chocolate Cream Pie in the movie, but I have had it two ways; made with an Oreo Crust and a Sweet Buttery Pie Crust. In all honesty, I prefer the Sweet Buttery Pie Crust when it comes to this recipe. The Oreo Crust is much easier to make, but I’ll have to choose quality over ease for this particular pie. With that being said, sometimes I just flat out don’t feel like making the Sweet Buttery Pie Crust because it’s more involved…which is why I include both crust recipes below for you to make that call. Feeling a time crunch? Oreo Crust. Feeling froggy? Pie Crust. Not feeling a crust at all? Pick up a pre-made Oreo Crust at the store. Look at all the options here, I can’t help but to love it. You know, you could also turn this into a Brownie Pie by making a thin batch of dark chocolate brownies in a 9×13 inch baking dish and use that as the crust… Okay, I’m gonna stop myself right there…

Chocolate Cream Pie
For a Sweet Buttery Pie Crust
2 1/4 sticks unsalted butter, cold
3 cups Gluten-Free All-Purpose Flour
3/4 cup confectioners sugar
1/2 teaspoon salt
3 large egg yolks
6 tablespoons water (add ice to make it super cold until ready to use)
1 teaspoon vanilla extract
Cut butter into small chunks, place in a small mixing bowl and put back in the refrigerator. In a large mixing bowl (or food processor), whisk together the flour, sugar, and salt. Add cold butter. Use a pastry tool (or pulse if using a food processor), cut butter into flour mixture until it resembles a coarse meal. In a small bowl, whisk together yolks, super cold water, and vanilla until combined well. Add to flour mixture, tossing with a fork or pulsing until incorporated. Form dough into a ball and divide into 2 pieces. Form each piece into a ball and flatten to form disks. Wrap each disk separately in plastic wrap, chill for at least 1 hour and up to 1 week in refrigerator, or up to 1 month in freezer.
Remove one dough disk from refrigerator, let soften slightly (about 15-30 minutes) before rolling out (my favorite way to roll out dough is on a silicone rolling mat). Roll to 1/4 inch thick, press dough into a 9 inch pie plate in the bottom and up the sides. Poke holes in the dough with a fork. Place pie plate in refrigerator to let dough chill for 15 minutes, while preheating oven to 400 degrees. Bake pie crust for 15-20 minutes, until a light golden brown. Let pie crust cool completely before filling with chocolate mousse.
For an Oreo Crust
24 Gluten-Free Oreo cookies, crushed into crumbs (using a food chopper or food processor)
5 tablespoons butter, melted
Preheat oven to 350 degrees. In a small mixing bowl, toss together Oreo crumbs and melted butter until well combined. Press into bottom and up sides of a 9 inch pie plate. Bake in oven for about 10 minutes, until crust is fragrant. Remove from oven and cool completely before filling with chocolate mousse.
For the Chocolate Layer
1/3 cup granulated sugar
2 1/2 cups half and half
6 large egg yolks
2 tablespoons cornstarch
6 tablespoons salted butter
8 oz. good quality chocolate chips (my favorite is Enjoy Life)
1/2 tablespoon vanilla extract
In a sauce pan on medium heat, combine the sugar, half and half, and whisk well to combine. Bring mixture to a simmer, whisking frequently. Combine the egg yolks and cornstarch in a small mixing bowl and whisk until smooth.
Once the saucepan mixture is simmering, slowly pour in about 1/2 cup of the hot liquid into the egg yolks and whisk to temper the eggs. Add a little more of the hot liquid into the egg yolks. Then, slowly whisk the egg yolk mixture back into the saucepan. Whisk constantly until the mixture begins to thicken and comes to a very gentle boil (you will see big bubbles break the surface).
Remove pan from the heat and pour over the butter, chocolate, and vanilla extract in a medium size mixing bowl. Stir until completely smooth and chocolate is melted. Pour filling into the cooled pie crust and smooth into an even layer. Place a piece of plastic wrap gently on top and refrigerate until filling is set, about 4–6 hours or overnight.
Whipped Cream Topping
1 cup heavy cream
1 tablespoon granulated sugar
1 teaspoon unflavored gelatin (optional, but this gives it more stability)
Combine heavy cream and sugar in a standing mixer or mixing bowl, beat at medium/high speed until soft peaks form. Sprinkle in gelatin and continue to beat for another 15-20 seconds. Spoon whipped cream into a pastry bag and pipe on top of chocolate layer with a cake decorating tip, or you can smooth into an even layer. Garnish with chocolate curls, if desired. Store in refrigerator for up to 5 days.
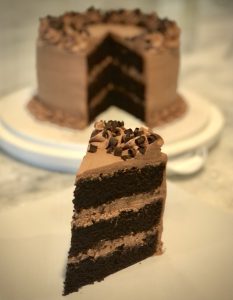
Chocolate Mousse Cake

Brownie Truffle Pie

Boston Creme Mini Tarts
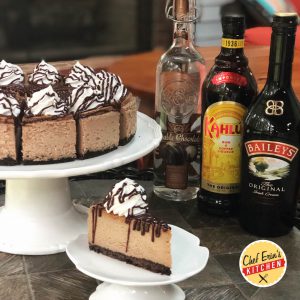
Mudslide Cheesecake

Dark Chocolate Mocha Truffles


Leave A Comment